Sewing Notes
All content copyright © 2010-2024 Frank Revelo, www.frankrevelo.com, United States copyright office registration number TX-7931345
There was little initial cost savings from sewing my own gear, due to the expense of the sewing machine, the higher markups on retail versus wholesale fabrics and other materials, and the wastage of fabric during the design phase. However, once I have a design fully worked out, it is normally cheaper to sew it myself than to buy it, even with my higher cost of materials compared to commercial manufacturers. In any case, my reason for sewing my own gear is not to save money but rather to create gear that is not available commercially, to modify commercial gear to fit my needs better, to repair gear, and to duplicate gear that is currently available commercially so as to avoid being impacted by constant design changes and out-of-stock situations with commercial gear. It is also possible for the materials I use to make and modify gear to be out-of-stock. I try to protect against this by buying up several years supply of materials in advance. Obviously, I could also buy up several years of commercial gear in advance, and in recent years I've been doing just that, but only if I am completely satisfied with the design of the commercial gear and don't anticipate any technological breakthroughs that would make the gear obsolete.
Sewing is not very difficult. Essentially, all that is required is to feed the fabric carefully under the needle, which does not demand significant hand-eye coordination. For outdoor gear, appearance is normally less important than functionality, so that seams can be slightly crooked rather than perfectly straight, which reduces the hand-eye coordination required still further. So learning to sew does not take long, and is well worth the effort, if only to be able to modify and repair commercial gear.
Sewing Machines
As with electronics, the best advice for sewing machines (at least for beginners, who don't need the features of expensive machines) is to buy inexpensive but new machines from a reputable manufacturer and then replace every few years. Don't buy used equipment (other than refurbished equipment direct from the manufacturer). Don't make the mistake of equating expensive with durable, don't try to repair anything major. If a cheap machine works the first week, it should normally continue working for years. When a cheap machine fails, it is an easy decision to simply throw it away and buy a new one. Throwing away an expensive machine is a more difficult decision, while trying to repair an expensive machine can lead to all sorts of frustration and expense.
Be sure to clean and oil your machine regularly, to reduce wear and tear.
My original machine was a Singer "Simple" model 3116. This machine never gave perfect stitches and the reverse switch eventually broke off. After some investigation, I learned these cheap Singer and Brother machines (which are widely available at Walmart and other discount stores for under $100 in 2009) have a bad reputation. My current machine is a Kenmore 15343, purchased for $90 in 2009 at Sears. This machine has fewer options than the Singer, but better stitch quality. Though the label says Kenmore, the manufacturer is Janome. This model has since been discontinued. The Janome Threadbanger TB12 (available for $199 from a variety of sources in 2009) appears to be a slightly better model. Janome appears to have a much better reputation among sewers than Singer. All of these are mechanical sewing machines. Electronic machines normally give better stitch quality, but sometimes are lacking in power. Stitch quality is less important for outdoor gear than power.
Both the Singer and Janome machines had enough power to punch through several layers of heavy fabric, which is the main requirement for sewing and repairing outdoor gear, and the Janome machine is particularly powerful.
If available, get the walking foot accessory at the same time you buy your sewing machine. A walking foot is very useful for sewing/repairing insulated garments. At the time I bought my Kenmore/Janome machine, Sears was also selling a walking foot accessory (made by Janome), which supposedly works on any machine with vertical bobbin, and not just the Janome machines.
Sources for fabrics and other materials
The following retailers I use frequently:
- Ray Jardine
- Outdoor Wilderness Fabrics
- Ripstop by the Roll
- Quest Outfitters
- Seattle Fabrics
- The Rain Shed
- Rockywoods Fabrics
- Thru-Hiker
The following retailers I have used infrequently:
- Z-Packs (sells cuben fabric)
- Oware
- Fibraplex
- Sodhoppers (goop soles for moccasins)
- AHH (rubber fabric for soles for moccasins)
I have not used any of the following retailers:
- Pennine Outdoor Fabrics (located in Great Britain)
- Pointnorth Outdoor Fabrics (located in Great Britain)
- Extrem-Textil (located in Germany)
- Shelby (located in Finland)
- DIY Tactical
- Tent Pole Technologies
Sewing tips
For items like tarp or sleep quilt, trace pattern on brown wrapping or "Kraft" paper from office supplies store, which normally comes in 24" or 30" wide rolls. Tape several sheets together for patterns which require more than this width.
Another option for tracing large patterns is vinyl or other stiff material, which can often be obtained cheaply at discount fabric shops.
A walking foot accessory is extremely useful (even essential) for sewing insulated garments. With a standard presser foot, only the bottom layer of fabric is pulled, which leads to puckering when there are 2 layers of slippery nylon with insulation in between. A walking foot accessory adds top feed dogs to match the bottom feed dogs, so that both top and bottom fabric layers are pulled at the same rate. The Kenmore/Janome machine offered a walking foot accessory for about $25 at the time I purchased my machine.
Extra brushes for applying seam-sealer are available in the plumbing supplies department at hardware stores. Ask for brushes used to apply plumbing solder.
Hardware stores sell long strips of metal in the building materials department that can be used as a straight-edge for drawing cutting lines (using a felt-tip pen) on the fabric for tarps and quilts. Another, more expensive possibility is something called a cutting guide, which comes in both a straight and a t-square model.
To neatly apply seam-sealer, squeeze a small drop onto the brush, then spread on the fabric, rather than squeezing directly onto the fabric.
Quality thread makes sewing much easier, by reducing snagging and jams in the sewing machine. Strong thread makes a huge difference in durability. Remember, the thread may be rubbed against sharp rocks for applications like backpacks and pants. I highly recommend the thread sold by Ray Jardine, which is designed for outdoor use. Gutermann all-polyester thread is okay for applications where the seams will not be subjected to heavy pressure, and has the advantage of coming in multiple colors so as to match fabric exactly. I use Gutermann all-polyester thread for my shirt, for example. Regardless of which thread you use, it must be either all-polyester (like the Thru-hiker and Ray Jardine and the better Gutermann threads) or all-nylon. Cotton-covered polyester, all-cotton and silk threads are much too fragile for outdoor use.
A sharp needle makes sewing easier and improves resulting seams, so replace the needle frequently. The mark of a dull needle is a popping sound when it penetrates the fabric. Heavyweight urethane-coated outdoor fabrics dull needles much quicker than lightweight uncoated fabrics. I use mostly Schmetz needles, either 80/12 for lightweight fabrics or 90/14 for heavier fabrics. 70/10 would be better for delicate silnylon, but the eye-hole in 70/10 needles is too small for my preferred thread, so I use 80/12 instead, which works well enough.
Attaching straps securely
The strongest seam for attaching a webbing strap to a backpack or tarp is the bartack with reinforcement grid:

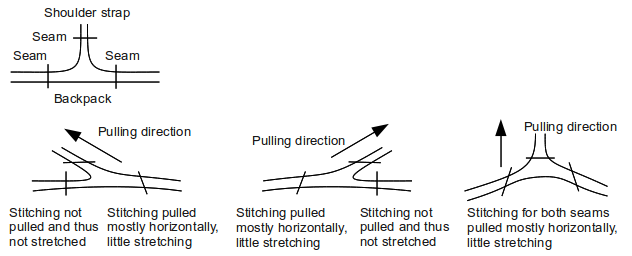
When attaching a single strap to the upper back area of a backpack, the reinforced bartack seam will be strong when pulled in the normal direction (such as when carrying the pack on the shoulders), but tends to rip out of the fabric when pulled in the other direction (such as when lifting the pack off the ground).

A better design involves using a pair of straps, with a bartack between them. Each strap of the pair turns in a different direction before being attached to the backpack. One of this pair of straps is the primary strap, which continues to the bottom of the pack and attaches there (with a reinforced bartack). The other strap is the secondary strap, which can terminate immediately after the bartack with the primary strap. In this design, neither seam is subject to stressful vertical forces, regardless of how the doubled strap is pulled:
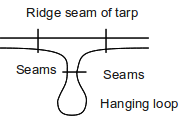
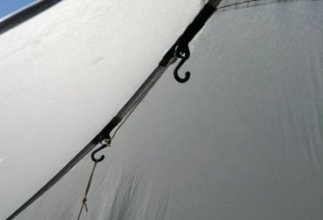
The double strap design is also useful for attaching the hanging loop to the underside of the tarp ridge-seam. In this case, the doubled strap is what forms the loop. The bartack which creates the loop (as opposed to the bartacks which attach the strap to the tarp ridge seam) can be a simple bartack rather than a reinforced bartack.